Ionic 3 - Drawer Behind Status Bar As Native Apps
21 May 2018You will learn how to make your app feel more native by making the drawer menu appear behind of the translucent status bar.
Requirements
In order to follow this tutorial, you need to have installed the following:
Difficulty
- Intermediate
Tutorial Contents
Please note that this tutorial will not cover installation steps of the required tools. Links were provided with instructions on how to install them.
Introduction
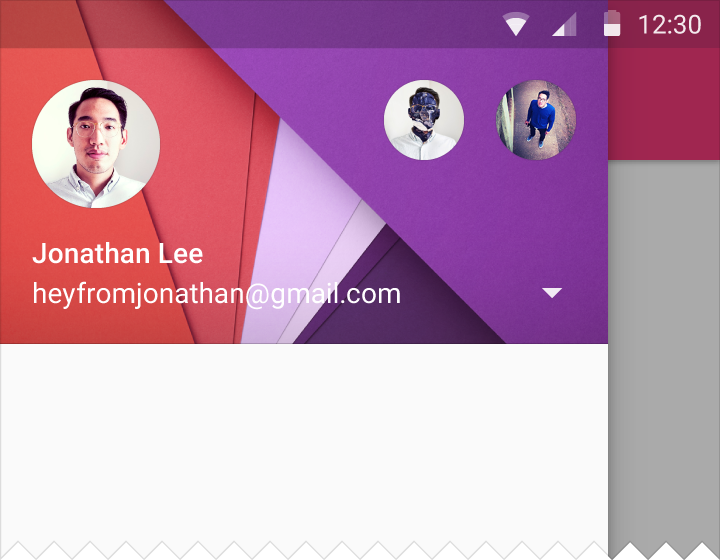
Have you ever see this in a native Android application? If so, this is beautiful! The color of the status bar is not solid and drawer can be seen behind the status bar. Sadly this behavior is not provided by default in Ionic. In order to achieve this behavior, a custom native code should be added as well as some CSS modifications to compensate the height of the app bar.
There is a repository ionic-super-bar which provides this feature. However, it has a limitation: When added, inputs at footer are hidden when the keyboard is open. Imagine a chat app where you need to have the input at the footer? This will not be a suitable solution since the end user will not be able to see what is being written.
This tutorial will combine to solutions in order to achieve the desired result. The first solution is to implement the ionic-super-bar method and the keyboard-attach-directive. Let’s get started!
Creating an Ionic project with side menu
The first step is to start a new Ionic project. In order to start a new Ionic project you need to run the following command:
ionic start
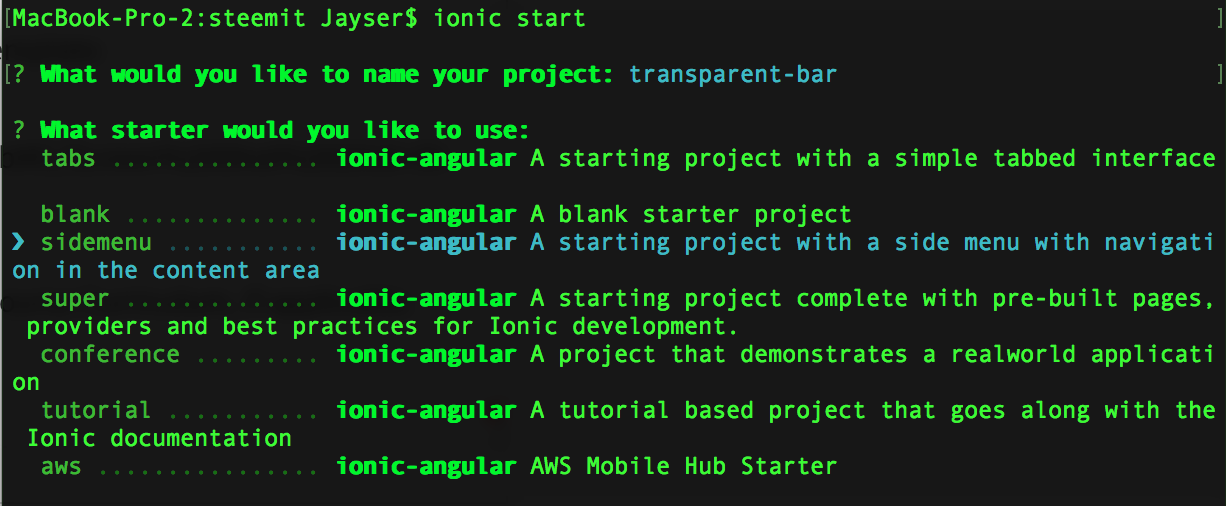
Then, the Ionic CLI will ask you few questions regarding the new project. First question will be the name of the application. For this example, I will use transparent-bar as a name.
Then, it will ask what starter do you want to use. In this step, select sidemenu as the template:
After few seconds, it will ask if you want to integrate native platforms for this project. Say yes as shown in the photo below:
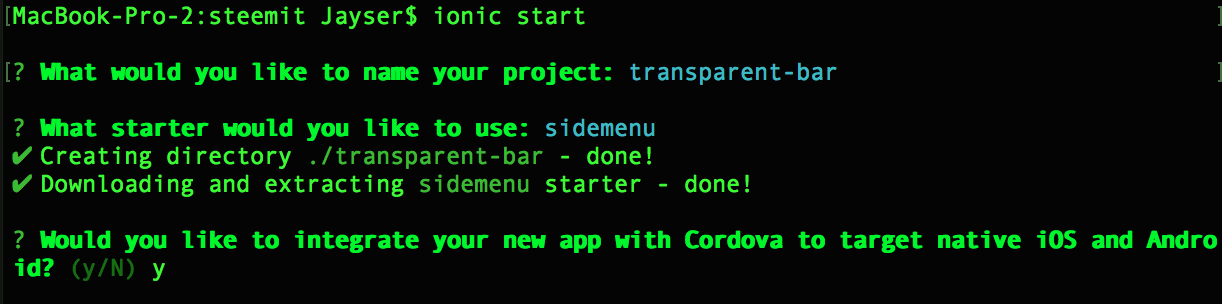
After everything is done installing, you will see the following text in your console:

Now it is time to navigate to the folder of the application. To do so, just do a simple cd command to the directory of the app:
cd ./transparent-bar
And then run the Ionic project by using the CLI command ionic serve –l:
ionic serve –l
After few seconds, a page like the following should be open in your browser:
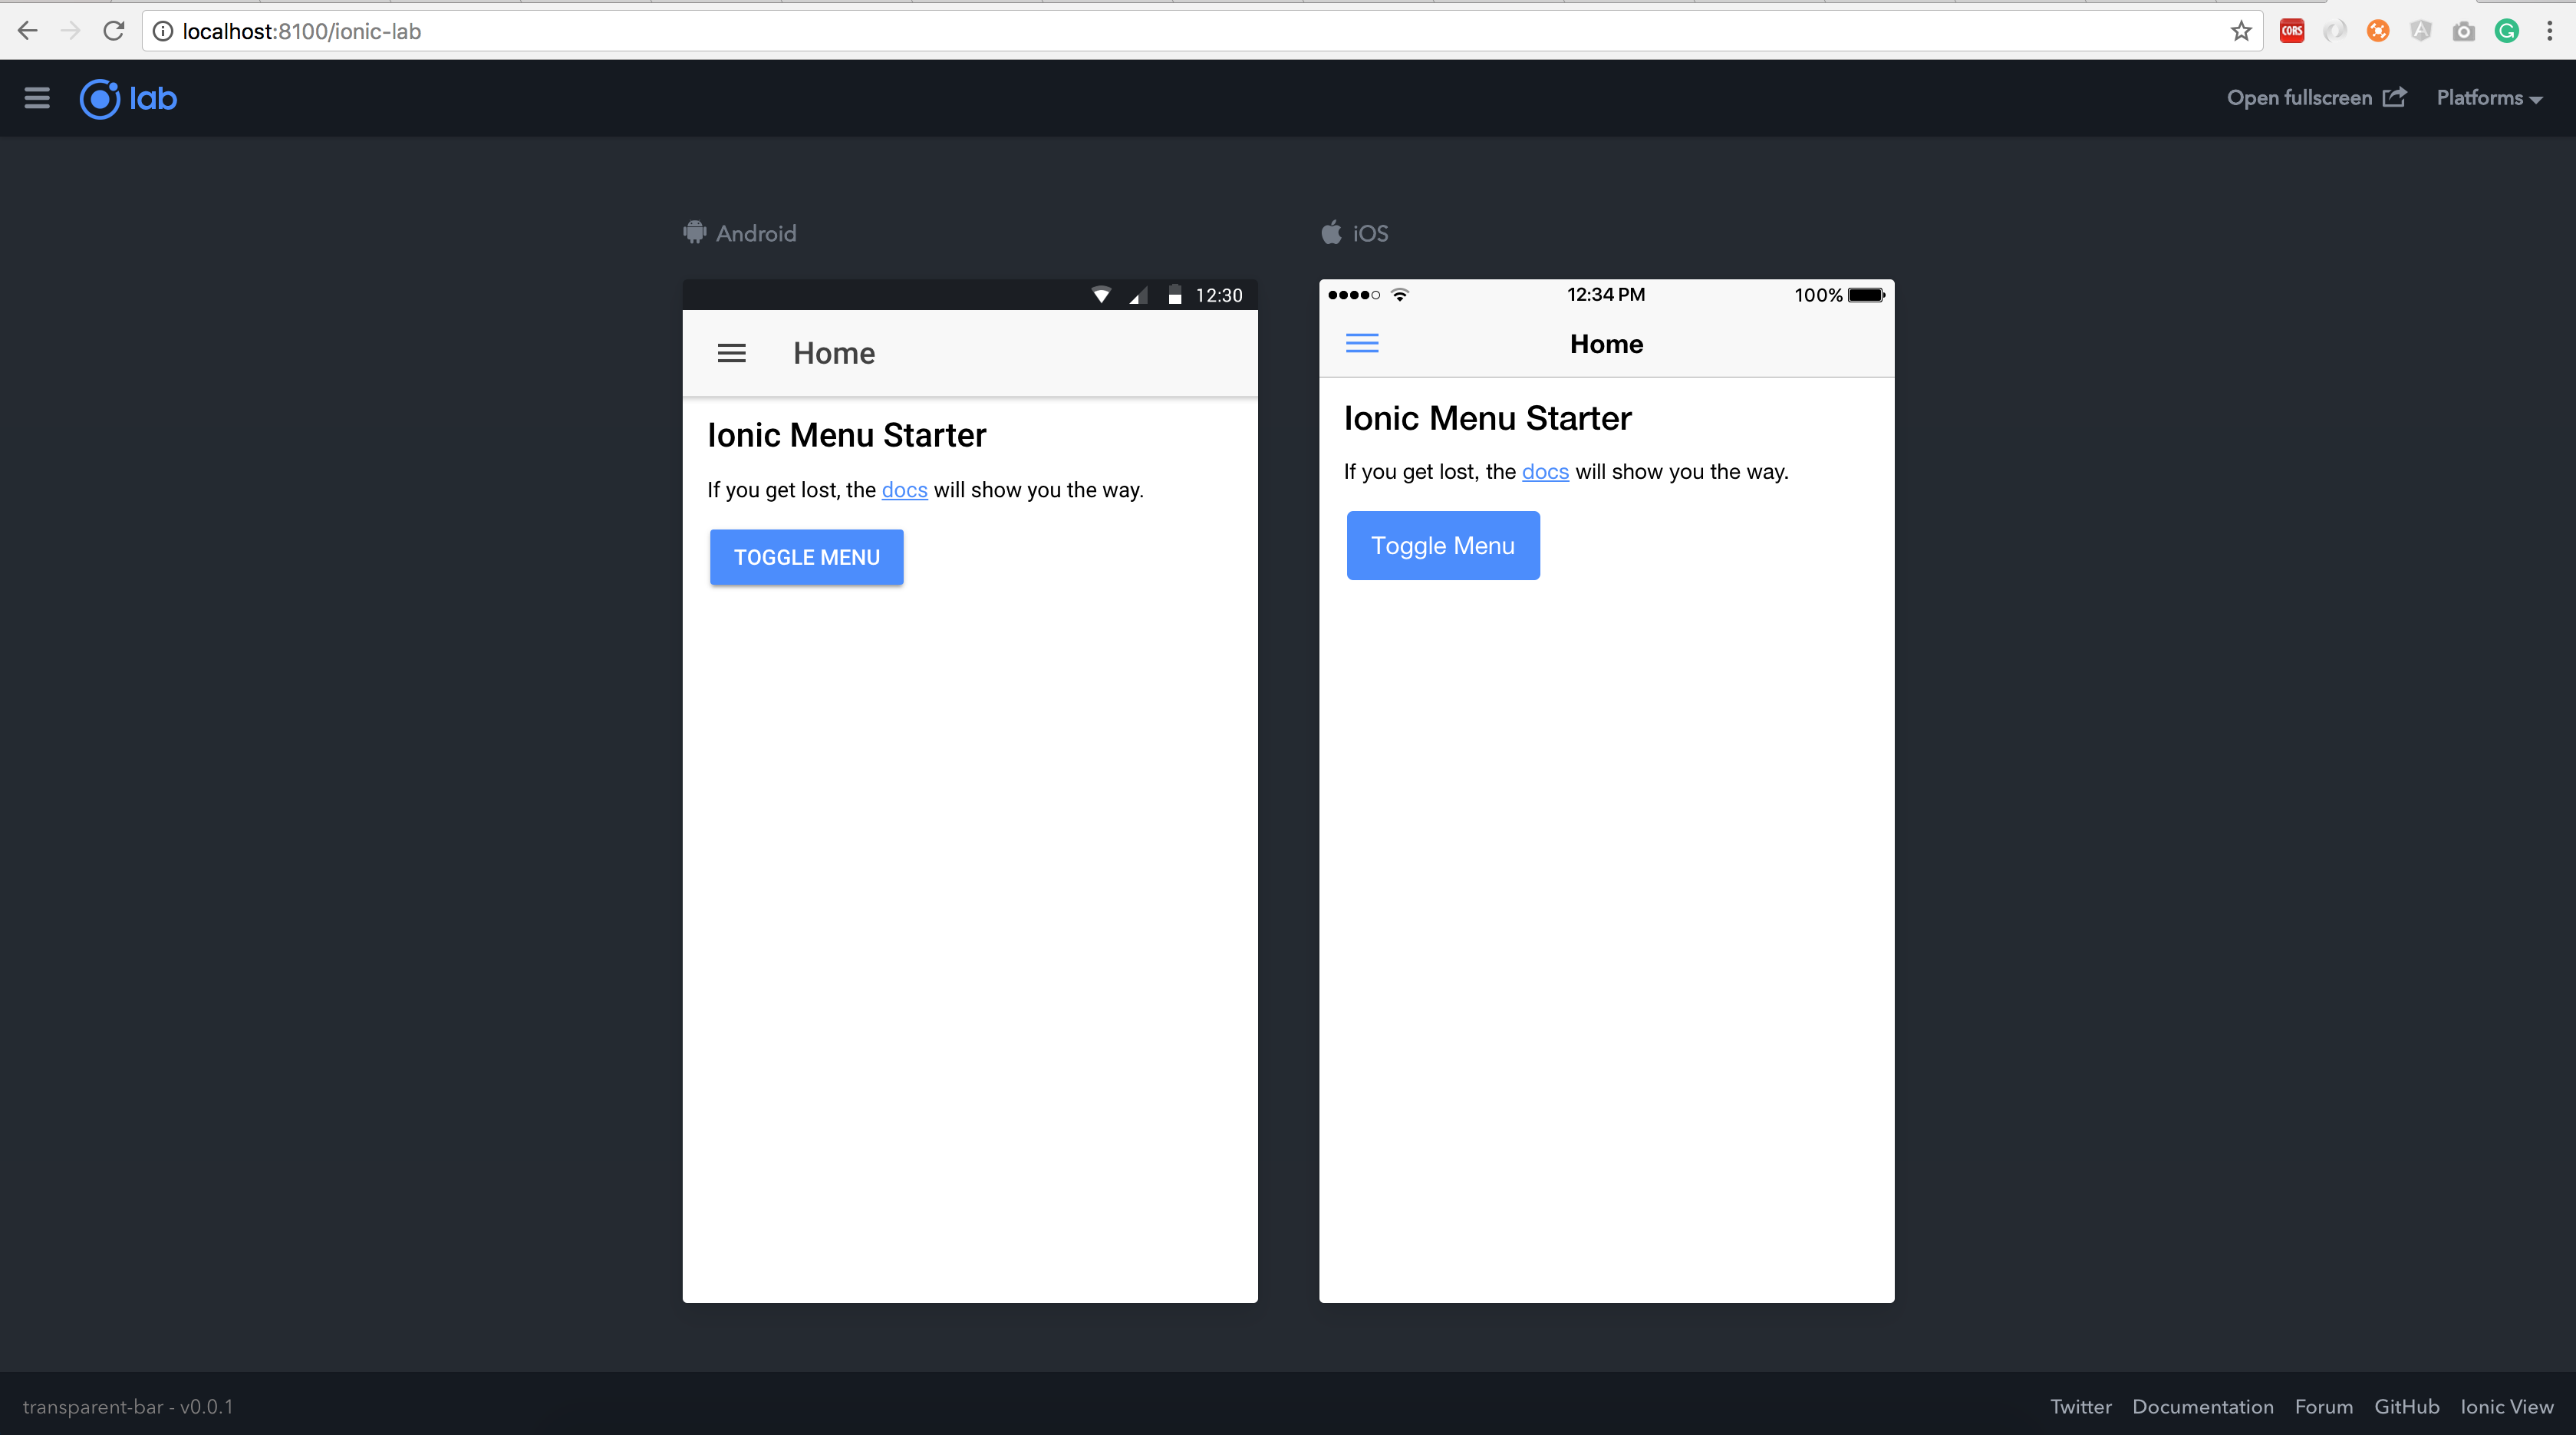
At this point, you will have a sidemenu project running correctly. Next step will be designing the drawer page.
Designing the drawer page
For this page, we will follow the design implemented in the ionic-super-bar project. I will be using the code from this project and I will be explaining it in details here.
The first is to open the app.html file in your favorite IDE. This file is located at the directory ‘src/app/’. When the file is opened, you should expect the following template:
<ion-menu [content]="content">
  <ion-header>
    <ion-toolbar>
      <ion-title>Menu</ion-title>
    </ion-toolbar>
  </ion-header>

  <ion-content>
    <ion-list>
      <button menuClose ion-item *ngFor="let p of pages" (click)="openPage(p)">

      </button>
    </ion-list>
  </ion-content>

</ion-menu>

<ion-nav [root]="rootPage" #content swipeBackEnabled="false"></ion-nav>
In order to replicate the material design drawer menu, the ion-header block should be deleted since material design drawer does not have a title but a big background photo at the header. After deleting this block, your code should look as the following:
<ion-menu [content]="content">

  <ion-content>
    <ion-list>
      <button menuClose ion-item *ngFor="let p of pages" (click)="openPage(p)">

      </button>
    </ion-list>
  </ion-content>

</ion-menu>

<ion-nav [root]="rootPage" #content swipeBackEnabled="false"></ion-nav>
Now, we will start bootraping the layout of the drawer. Drawers contains the following elements:
At the header:
- Background image
- Profile image
- Name (or more info)
After the header:
- A list or multiple lists with menu’s items
In order to have elements on top of an image, they should be all wrapped into a div. Also, the profile image with the “name” should be wrapped into another div. Thus, we can expect the following code:
<ion-menu [content]="content">

  <ion-content>
    <div>
      <img src="header image" alt="menu-header">
      <div>
        <img src="profile image">
        <p>Transparent Bar</p>
      </div>
    </div>

    <ion-list>
      <button menuClose ion-item *ngFor="let p of pages" (click)="openPage(p)">

      </button>
    </ion-list>
  </ion-content>

</ion-menu>

<!-- Disable swipe-to-go-back because it's poor UX to combine STGB with side menus -->
<ion-nav [root]="rootPage" #content swipeBackEnabled="false"></ion-nav>
As you can notice, urls for header image and profile image were not included. So, we will include them now. Feel free to save the following two images into the assets folder of your Ionic project:
Save this one as avatar.png Avatar image
Save this one as header.jpg Header image
Then, reflect the code as the following:
<ion-menu [content]="content">

  <ion-content>
    <div>
      <img src="assets/header.jpg" alt="menu-header">
      <div>
        <img src="assets/avatar.png">
        <p>Transparent Bar</p>
      </div>
    </div>

    <ion-list>
      <button menuClose ion-item *ngFor="let p of pages" (click)="openPage(p)">

      </button>
    </ion-list>
  </ion-content>

</ion-menu>

<ion-nav [root]="rootPage" #content swipeBackEnabled="false"></ion-nav>
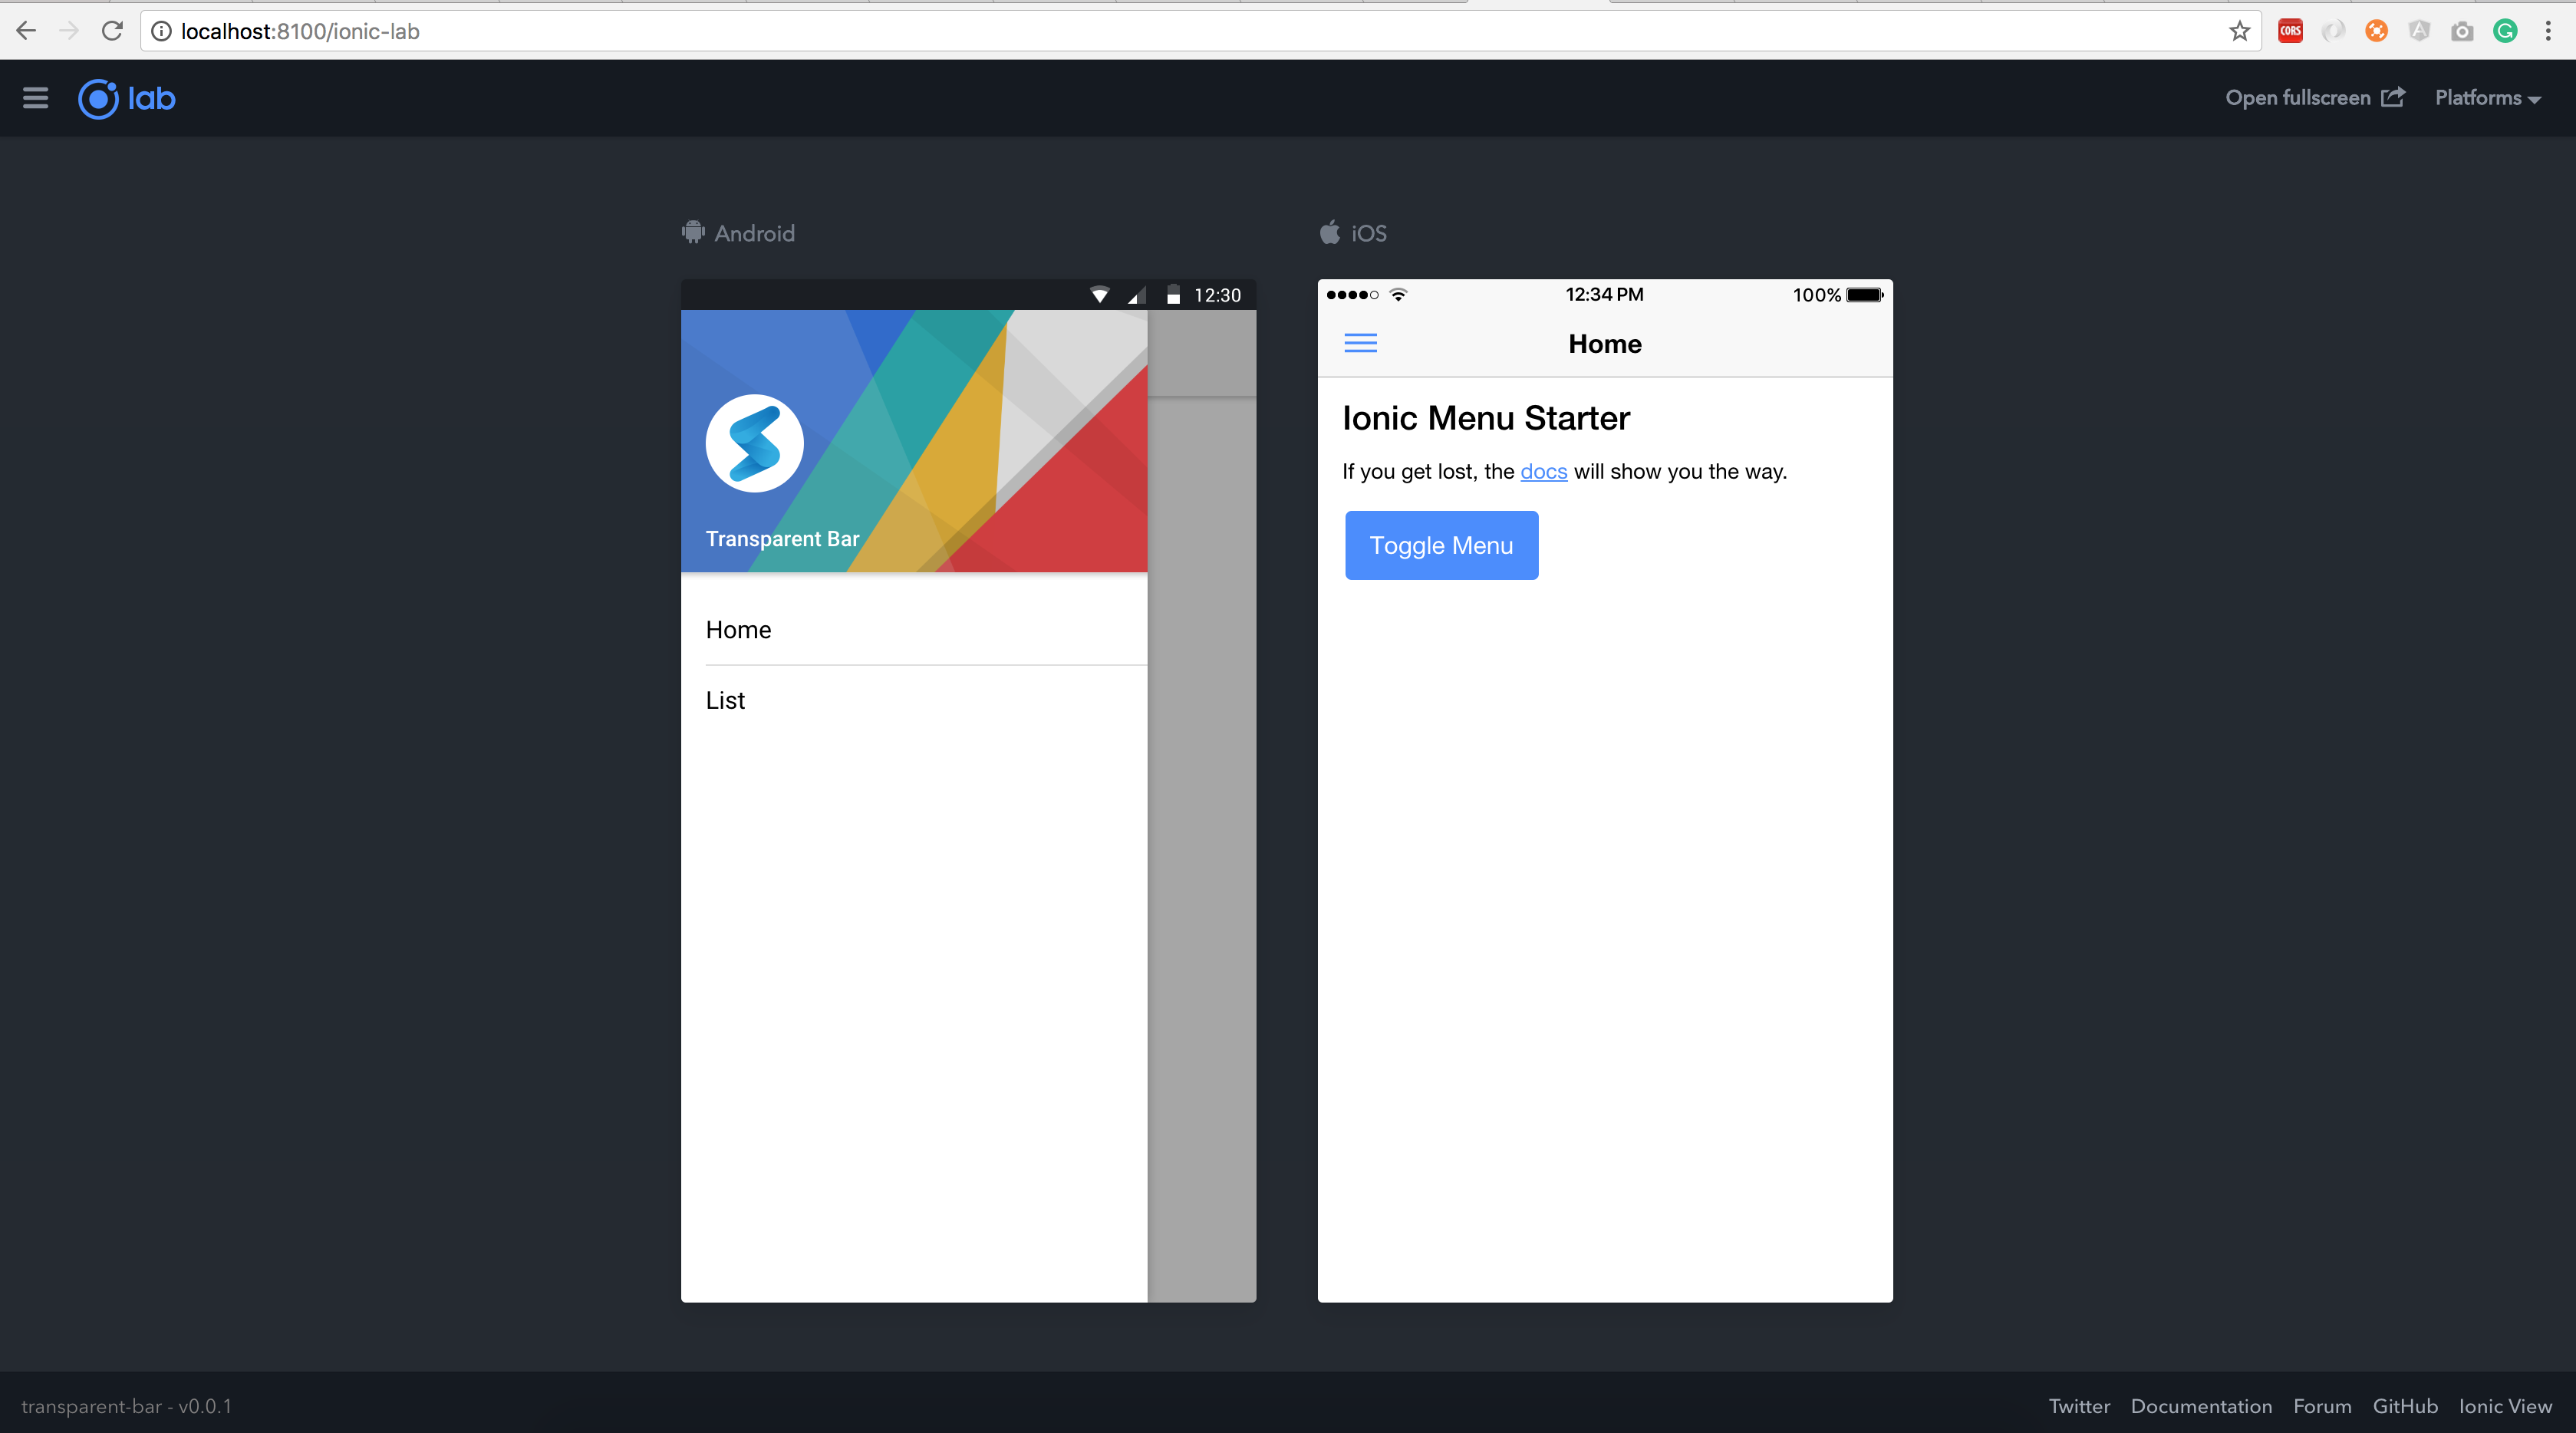
If you check the Ionic application in the browser, it will look very bad since it does not have any CSS style yet:
So, let’s start writing the styles. Now open the app.scss file and paste the following code:
.menu-content {
    .avatar {
           position: absolute;
           bottom: 0.8rem;
           left: 1.6rem;

           img {
                 height: 6.4rem;
                 margin-bottom: 1.6rem;
                 border-radius: 100%;
          }

          p {
                color: #fff;
                font-weight: 500;
         }
   }
}

.mask::before {
      position: absolute;
      top: 0;
      left: 0;
      content: '';
      width: 100%;
      height: 100%;
      background-color: rgba(0, 0, 0, .15);
}

.cover {
      position: relative;
      line-height: 0;

      .header {
            position: absolute;
            top: $cordova-md-statusbar-padding;
            left: 0.8rem;
      }

      img.cover {
            width: 100%;
            border: none;
           vertical-align: middle;
      }
}
In brief, the code above will wrap all the elements in the header and will assign a position to them. I wish I can talk more about this snippet but it will be offtopic and it is really clear to understand at an intermediate level. However, after writing this CSS, you should add them to your app.html file as well. Your code will look like the following:
<ion-menu [content]="content">

  <ion-content class="menu-content">
    <div class="cover header-md mask" margin-bottom>
      <img src="assets/header.jpg" alt="menu-header">
      <div class="avatar">
        <img src="assets/avatar.png">
        <p>Transparent Bar</p>
      </div>
    </div>

    <ion-list>
      <button menuClose ion-item *ngFor="let p of pages" (click)="openPage(p)">

      </button>
    </ion-list>
  </ion-content>

</ion-menu>

<ion-nav [root]="rootPage" #content swipeBackEnabled="false"></ion-nav>
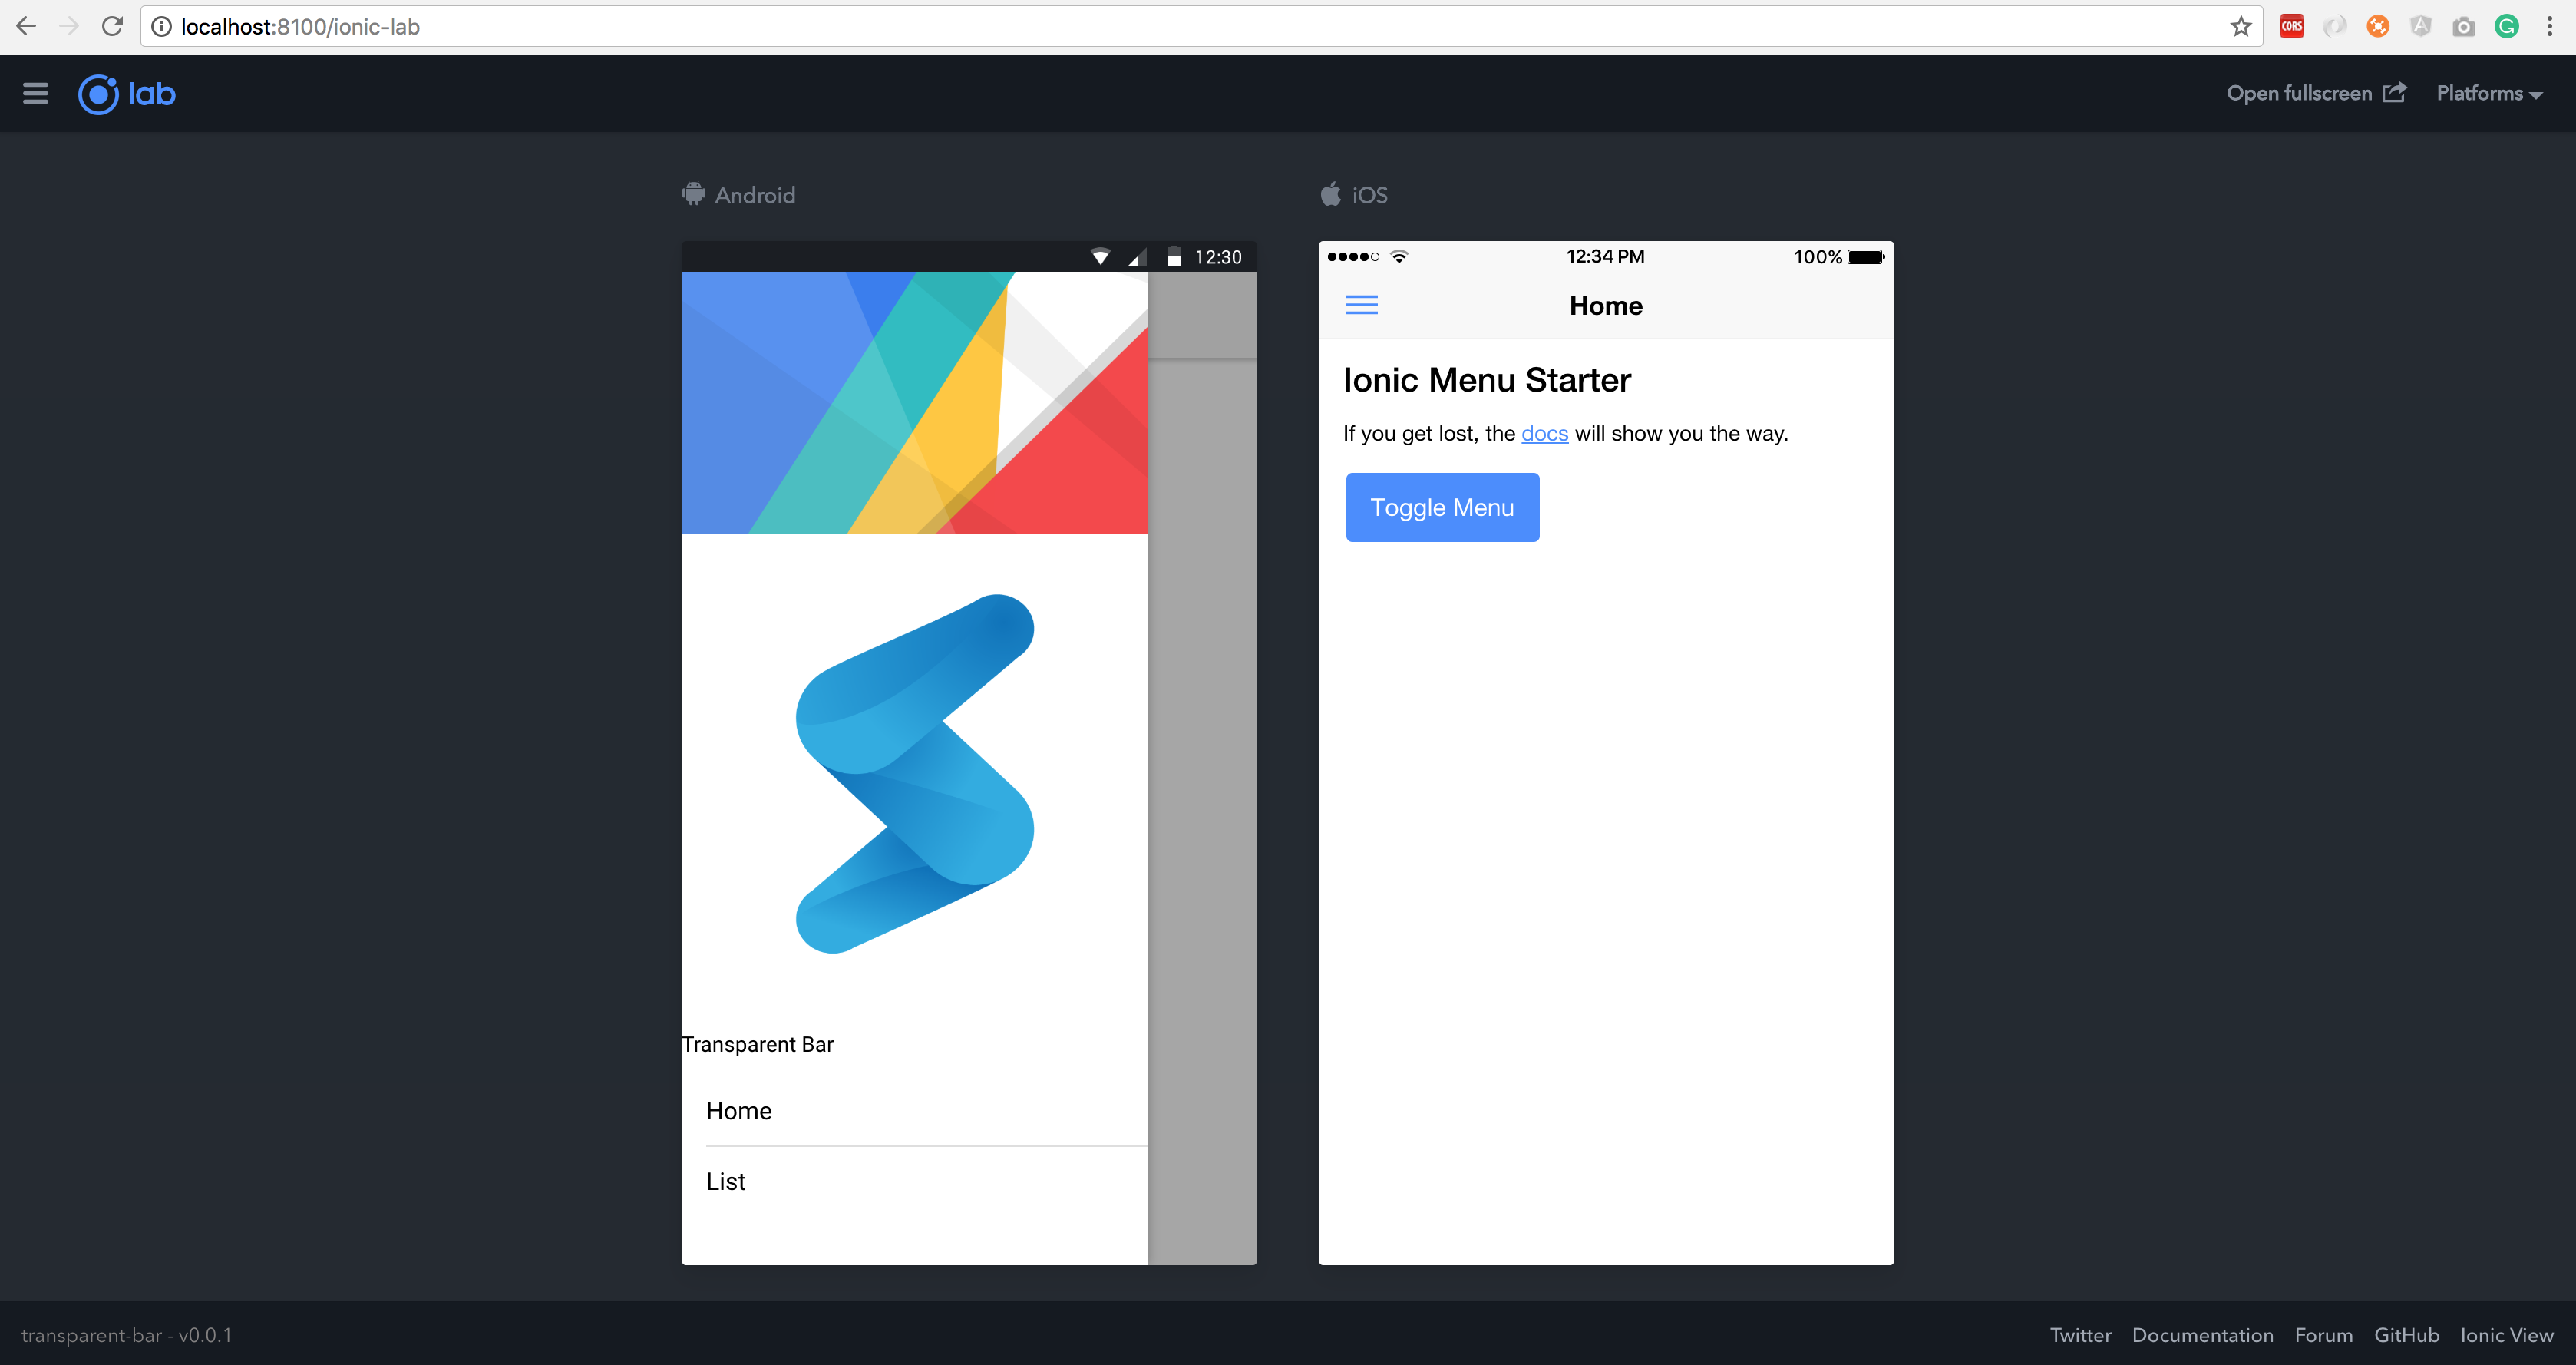
Note the “margin-bottom” attribute added. This will create a margin at the bottom of the element to avoid this content being together with the border of the element. After this, you can expect the following design:
And there it goes. This is the correct look of a Material design drawer.
Setting up the status bar color
The next step is to set the status bar color. This time, the status bar will not have a solid color but instead a color given by a hexadecimal string. Android uses hexadecimal ARGB values which are given in the format of #AARRGGBB. For this tutorial, we will use a 20% of transparency which is given by 33. More information about the opacity values can be found at https://stackoverflow.com/questions/5445085/understanding-colors-on-android-six-characters/11019879#11019879
So, open the app.component.ts file and in the initializeApp() method perform the following operation:
Replace this.statusBar.styleDefault(); with:
if (this.platform.is('android')) {
        this.statusBar.backgroundColorByHexString("#33000000");
}
Basically, this code will detect first if the platform is Android. If so, the status bar color will be a 20% transparent black color. At the end, your whole initializeApp() method should look as the following:
initializeApp() {
    this.platform.ready().then(() => {
      // Okay, so the platform is ready and our plugins are available.
      // Here you can do any higher level native things you might need.
      if (this.platform.is('android')) {
        this.statusBar.backgroundColorByHexString("#33000000");
      }
      this.splashScreen.hide();
    });
  }
Now, you will have a transparent status bar. Now the next step is the native modification of the main activity.
Modifying activity file of Android
Now, we need to modify the MainActivity.java file of the application. First, if the platform folder is not present at your project, run the following command in your console:
ionic cordova build android
If you already have this folder, feel free to skip the step above. Now, let’s locate the MainActivity file. This file is located at the following path:
/platforms/android/app/src/main/io/ionic/starter/MainActivity.java
Open this file and you should get the following content:
/*
       Licensed to the Apache Software Foundation (ASF) under one
       or more contributor license agreements.  See the NOTICE file
       distributed with this work for additional information
       regarding copyright ownership.  The ASF licenses this file
       to you under the Apache License, Version 2.0 (the
       "License"); you may not use this file except in compliance
       with the License.  You may obtain a copy of the License at

         http://www.apache.org/licenses/LICENSE-2.0

       Unless required by applicable law or agreed to in writing,
       software distributed under the License is distributed on an
       "AS IS" BASIS, WITHOUT WARRANTIES OR CONDITIONS OF ANY
       KIND, either express or implied.  See the License for the
       specific language governing permissions and limitations
       under the License.
 */

package io.ionic.starter;

import android.os.Bundle;
import org.apache.cordova.*;

public class MainActivity extends CordovaActivity
{
    @Override
    public void onCreate(Bundle savedInstanceState)
    {
        super.onCreate(savedInstanceState);

        // enable Cordova apps to be started in the background
        Bundle extras = getIntent().getExtras();
        if (extras != null && extras.getBoolean("cdvStartInBackground", false)) {
            moveTaskToBack(true);
        }

        // Set by <content src="index.html" /> in config.xml
        loadUrl(launchUrl);
    }
}
In this file, after the last import, write the following code:
import android.os.Build;
import android.view.WindowManager;
And then after the super.onCreate(savedInstanceState); code, write the following:
if (Build.VERSION.SDK_INT >= Build.VERSION_CODES.KITKAT) {
            getWindow().setFlags(
                WindowManager.LayoutParams.FLAG_TRANSLUCENT_STATUS,
                WindowManager.LayoutParams.FLAG_TRANSLUCENT_STATUS
            );
}
Basically, this will check if the current build version is equal or larger than KitKat Android version. If so, the webview will be set as fullscreen. Otherwise, will be set as normal.
Now, we need to set another CSS rule to compensate the status bar height by adding a padding to the app bar so the content does not get behind the status bar. So, in app.scss file, insert the following code in any part of it:
.platform-android {
    .ion-page {
      ion-header {
        padding-top: $cordova-md-statusbar-padding;
        background-color: color($colors, primary);
      }
    }
}
Note that the variable $cordova-md-statusbar-padding is predefined by default in Ionic.
In addition, since we added a native platform, the default color of the status bar should be also set in the config.xml file. So, open this file and insert the following line:
<preference name="StatusBarBackgroundColor" value="#33000000" />
This line should be included in between the following lines
<preference name="SplashScreenDelay" value="3000" />
...
<platform name="android">
If we run this code in Ionic lab, you will not see a big difference other than a simulated status bar:
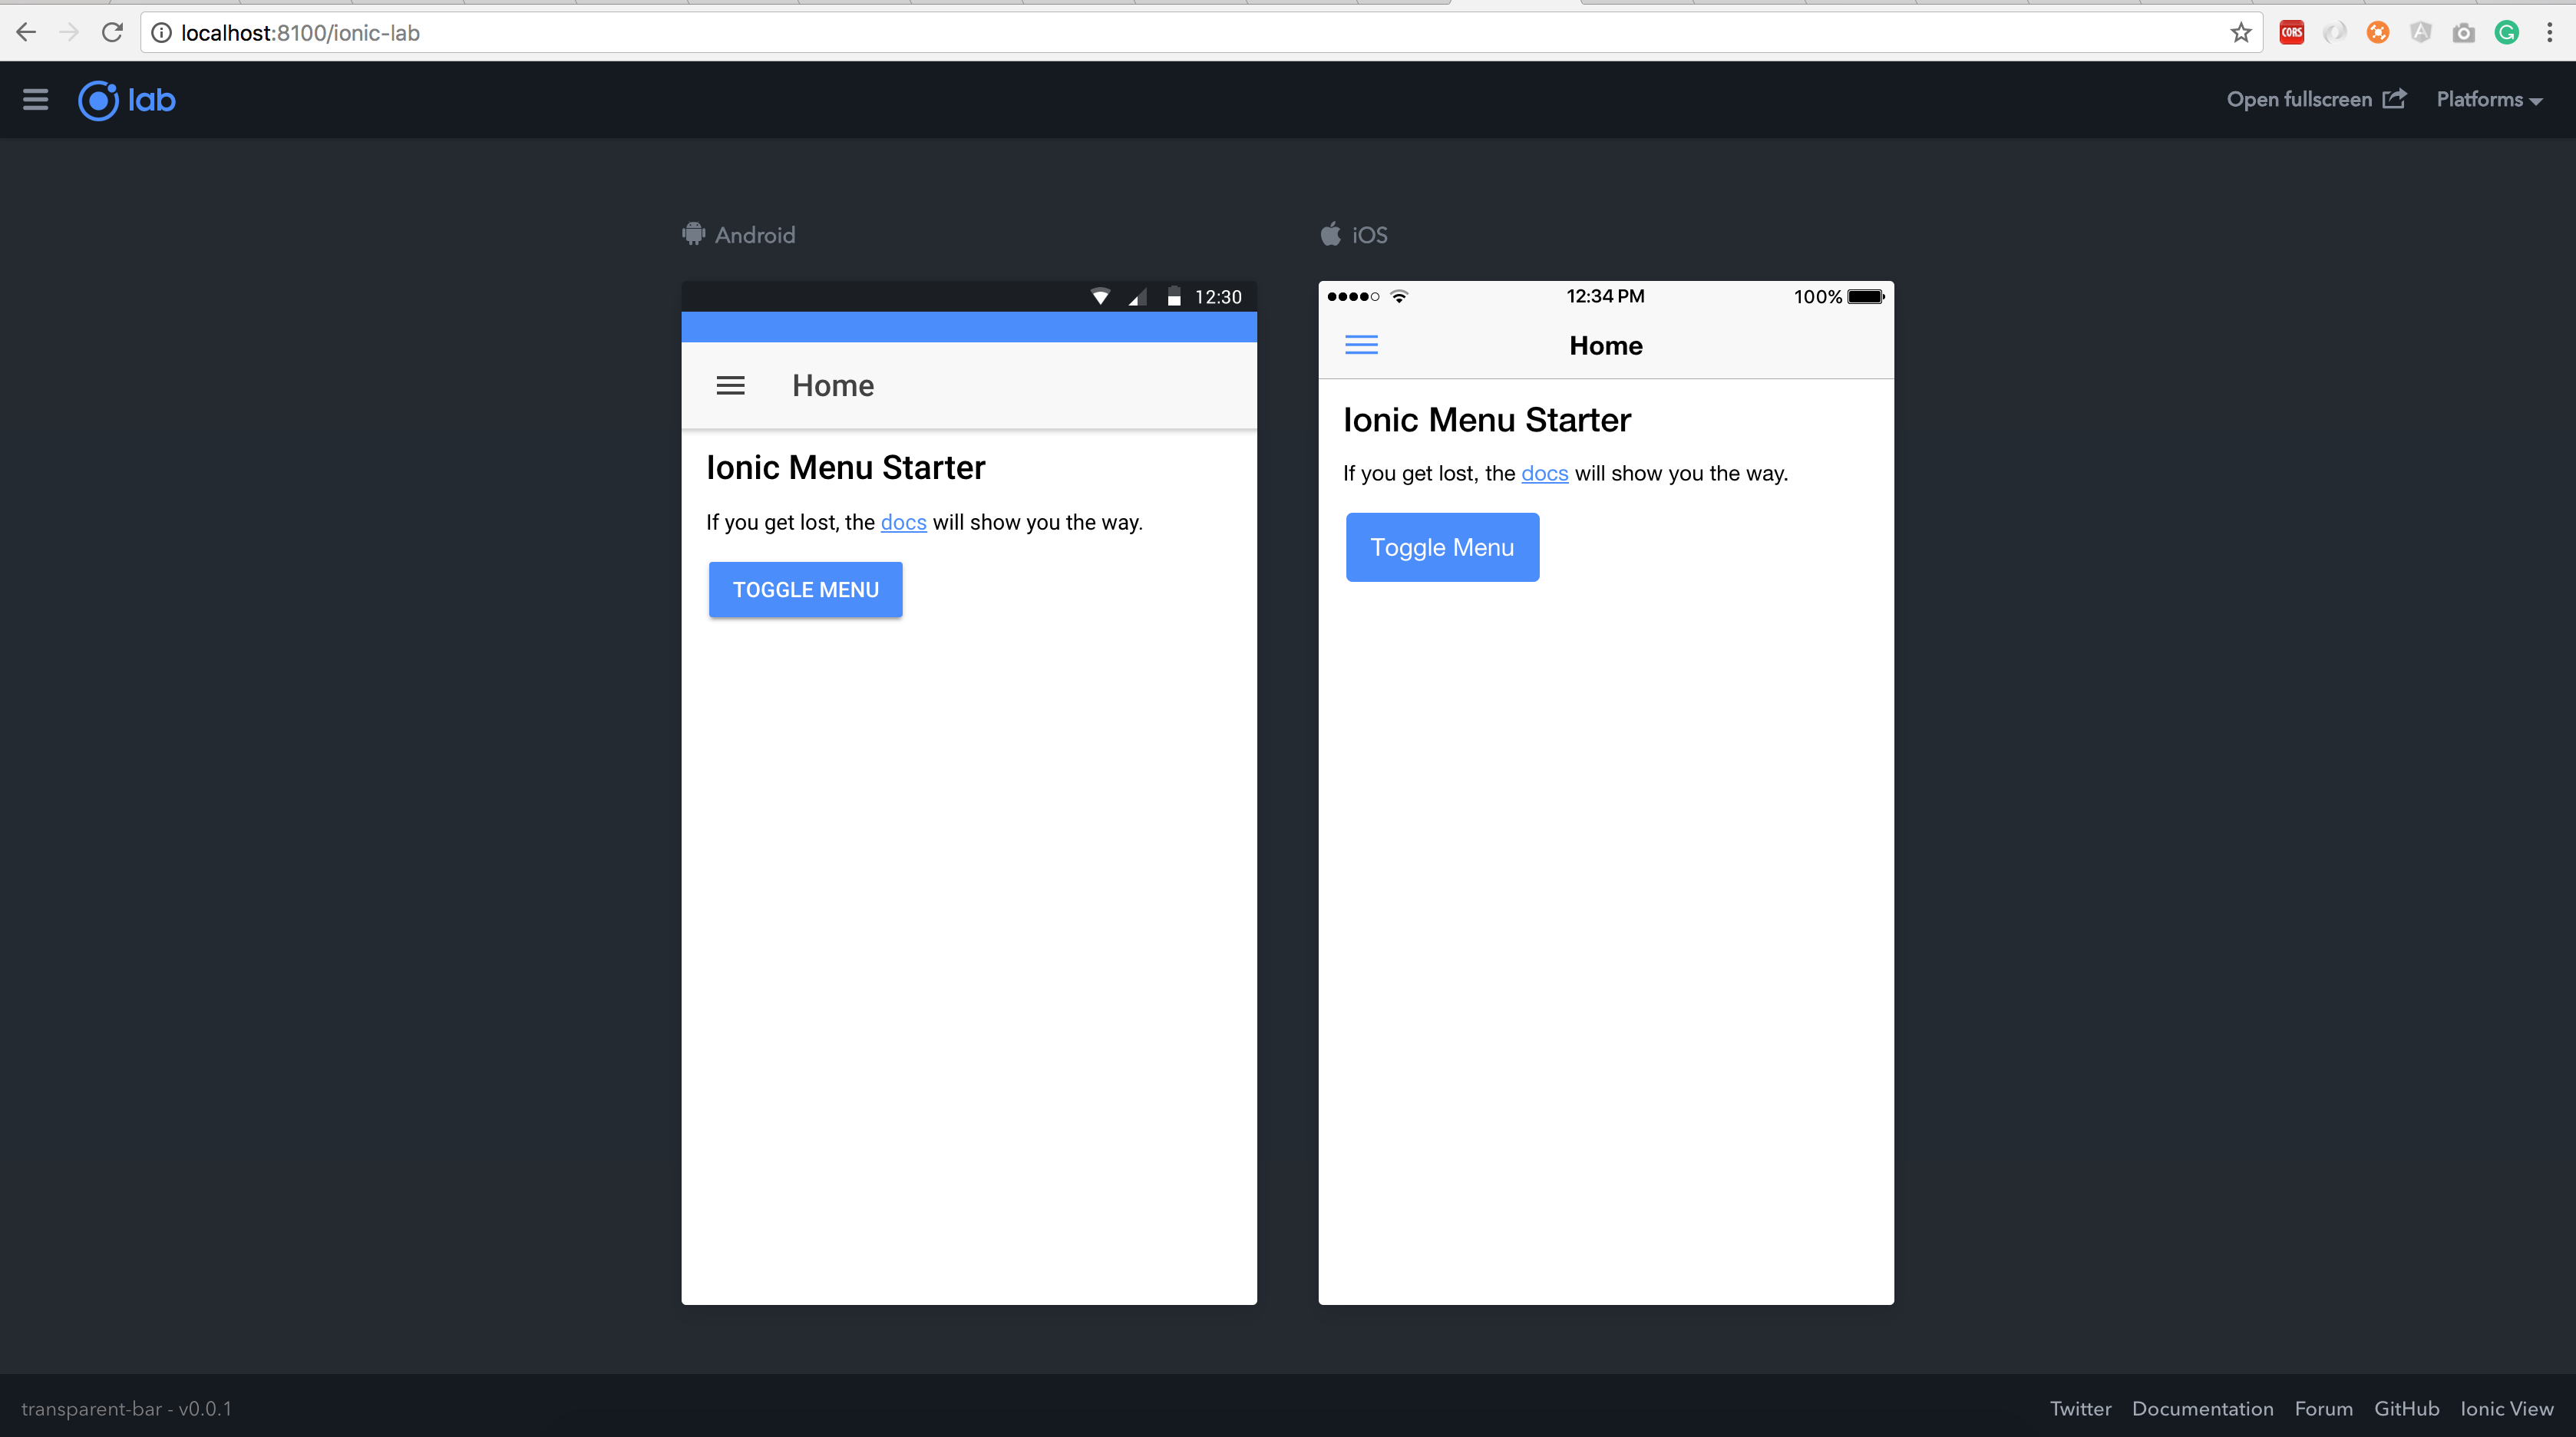
This status bar represent the one in your device. However, its color should match the app bar color. In our case, we will setup the app bar to blue. To do so, go to the home.html file which is located in the pages folder and add the color=primary” directive to the ion-navbar element:
<ion-header>
  <ion-navbar color="primary">
    <button ion-button menuToggle>
      <ion-icon name="menu"></ion-icon>
    </button>
    <ion-title>Home</ion-title>
  </ion-navbar>
</ion-header>

<ion-content padding>
  <h3>Ionic Menu Starter</h3>

  <p>
    If you get lost, the <a href="http://ionicframework.com/docs/v2">docs</a> will show you the way.
  </p>

  <button ion-button secondary menuToggle>Toggle Menu</button>
</ion-content>
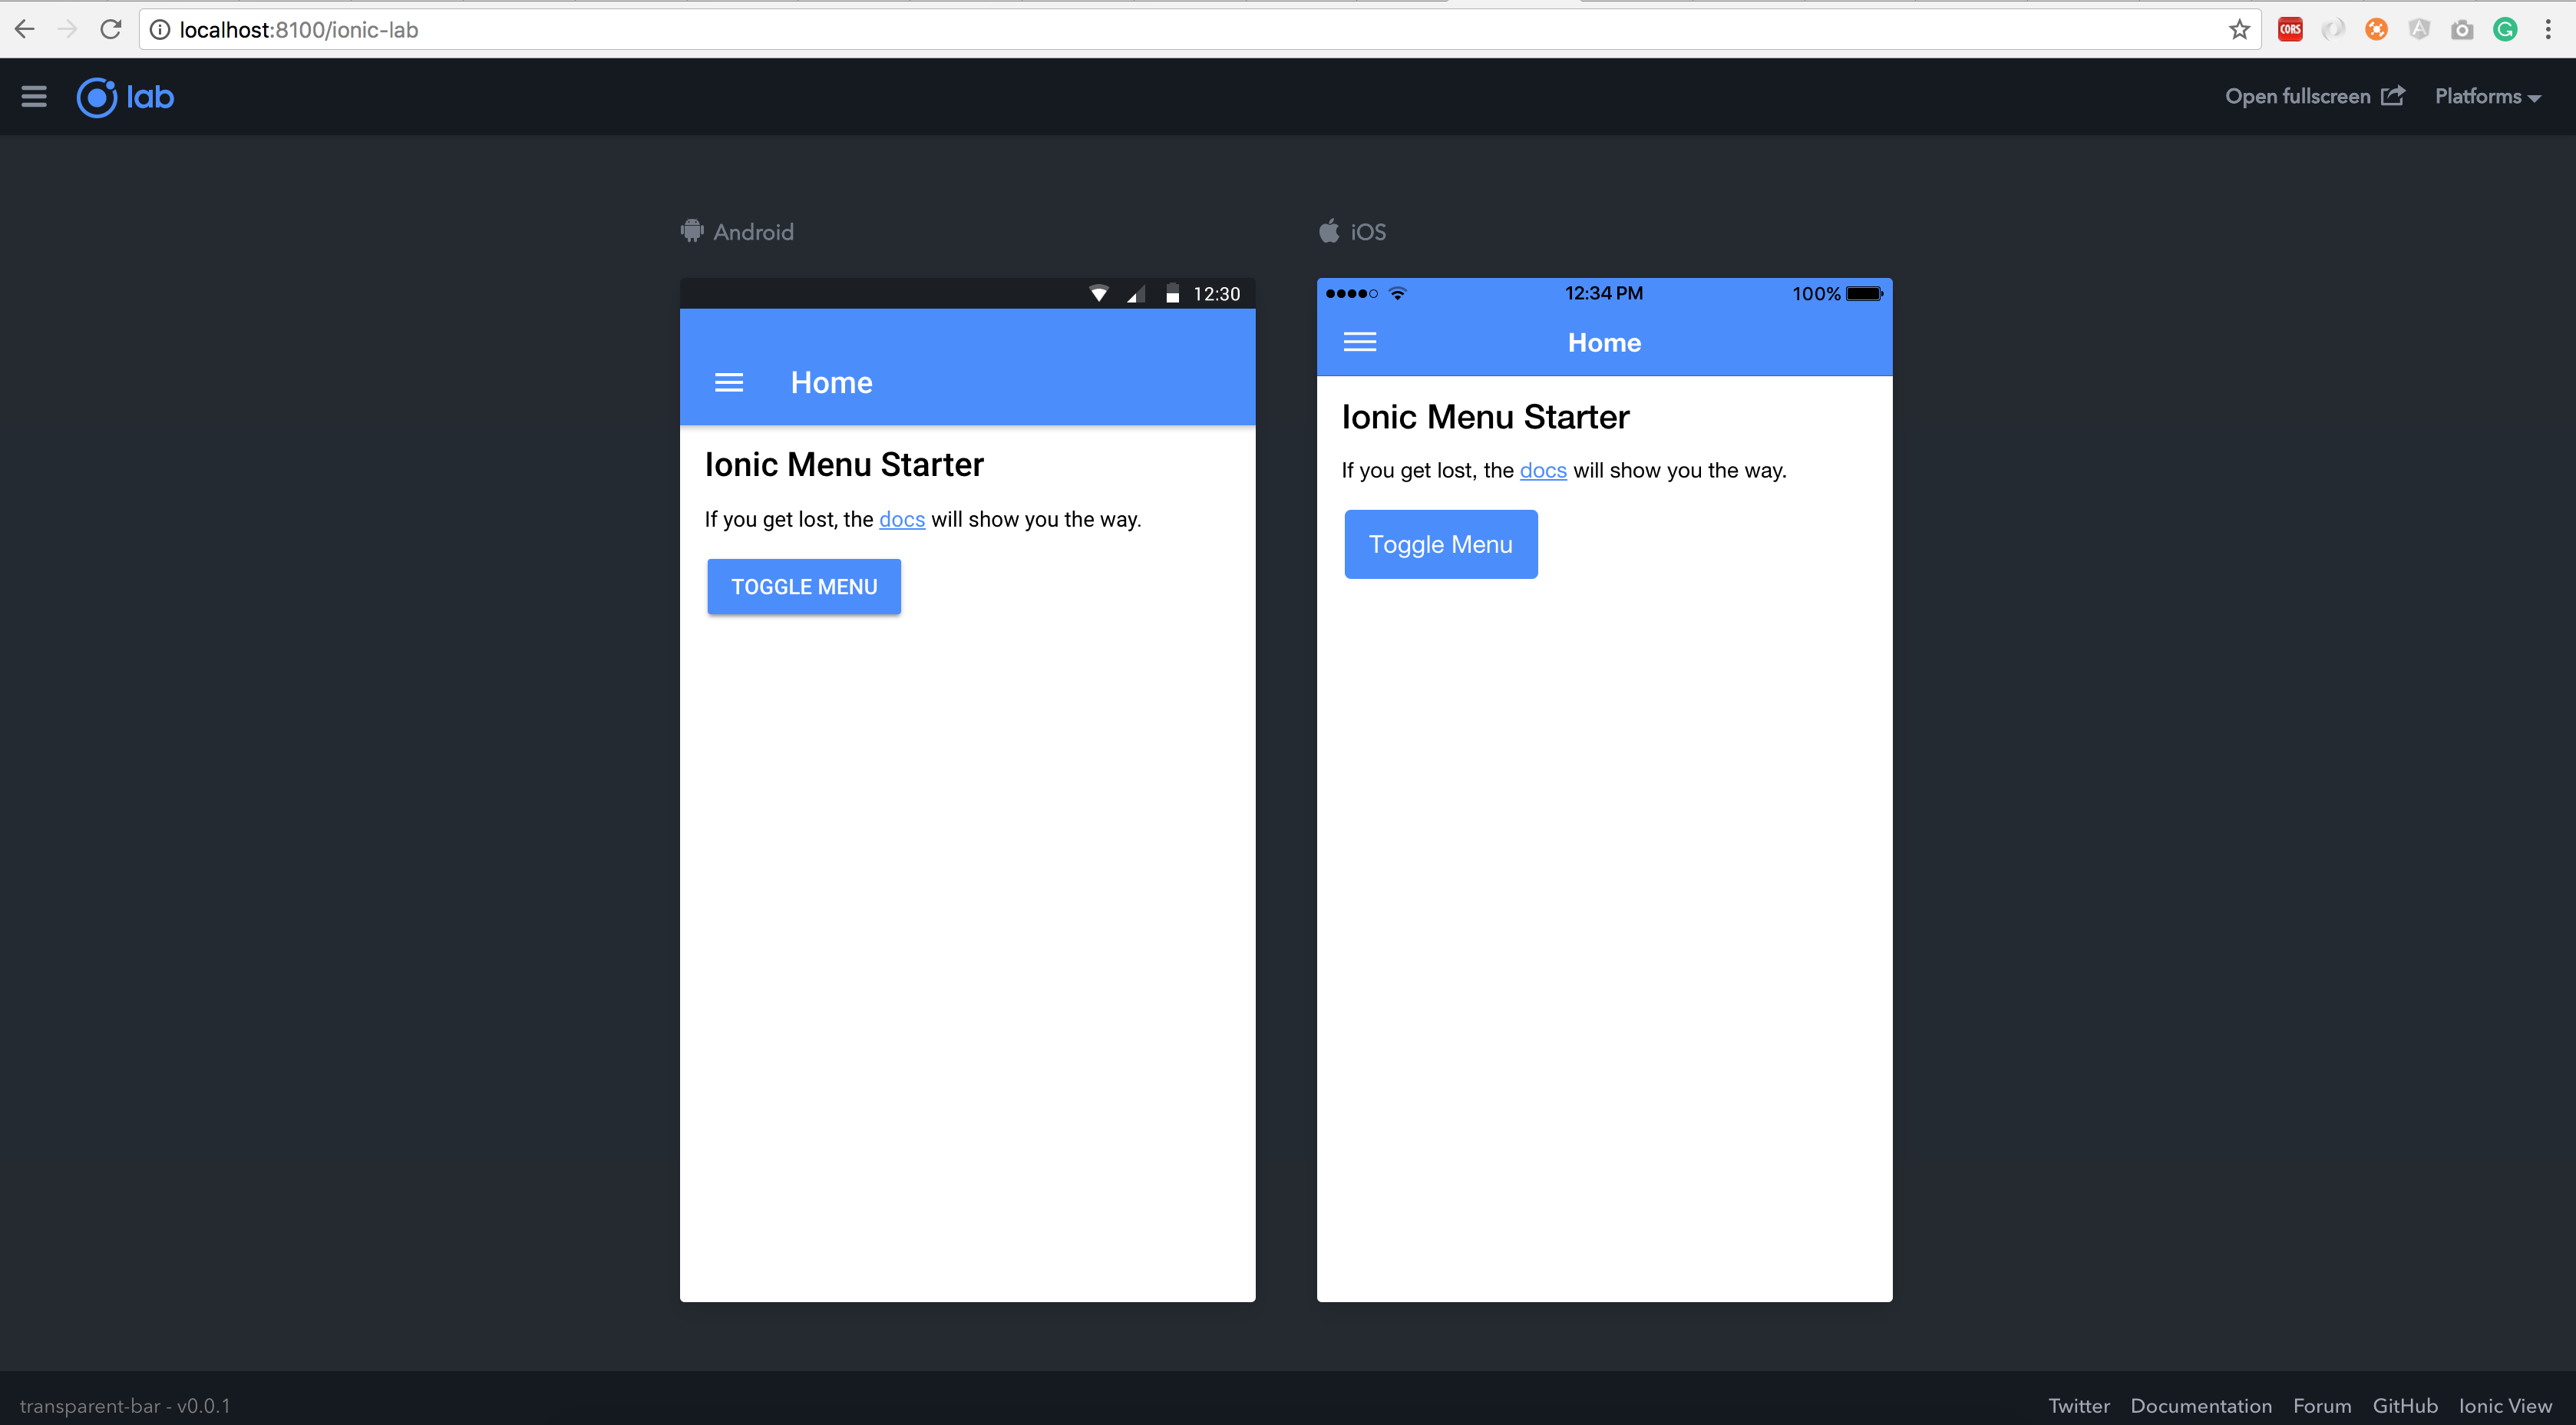
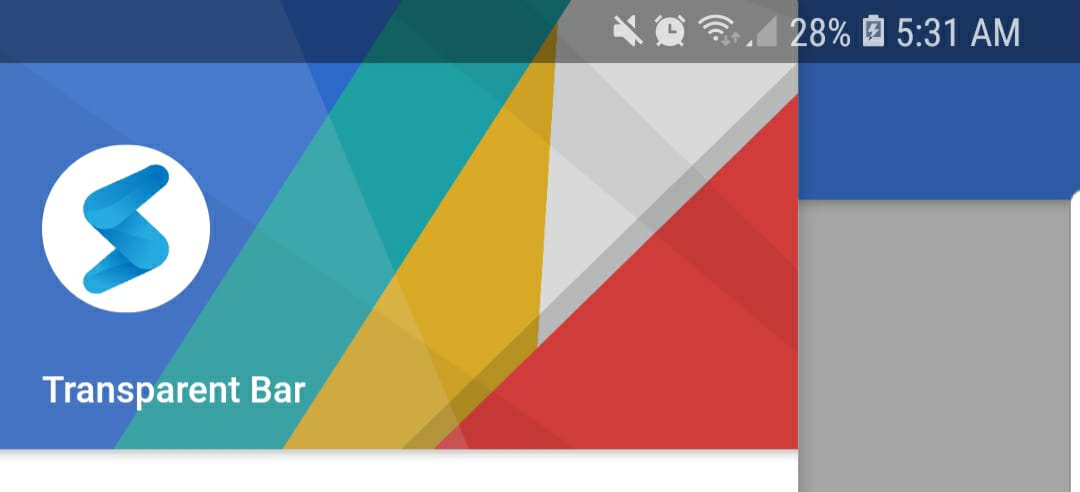
And now the color should be consistent. Note that in a real device the status bar will have an overlay of 20% black in order to make the contrast following the Material design guidelines:
At this point, you should have correctly set up the drawer behind the status bar.
Running on device
In order to see the real changes, we need to run the application in a device or emulator. In my case, I will run it into my device. So, supposing that your device is correctly connected to your laptop, run the following command in your console:
ionic cordova run android –prod –aot
And you should get the following result:
Correcting the input behind keyboard
As side effect of forcing Ionic to run in full screen, our inputs located at footer area will be hidden by the keyboard. For instance, let add a footer with an input in the home page. So, add the following code at the end of the file home.html
<ion-footer>
  <ion-toolbar>
    <ion-input type="text" placeholder="Type anything here"></ion-input>
  </ion-toolbar>
</ion-footer>
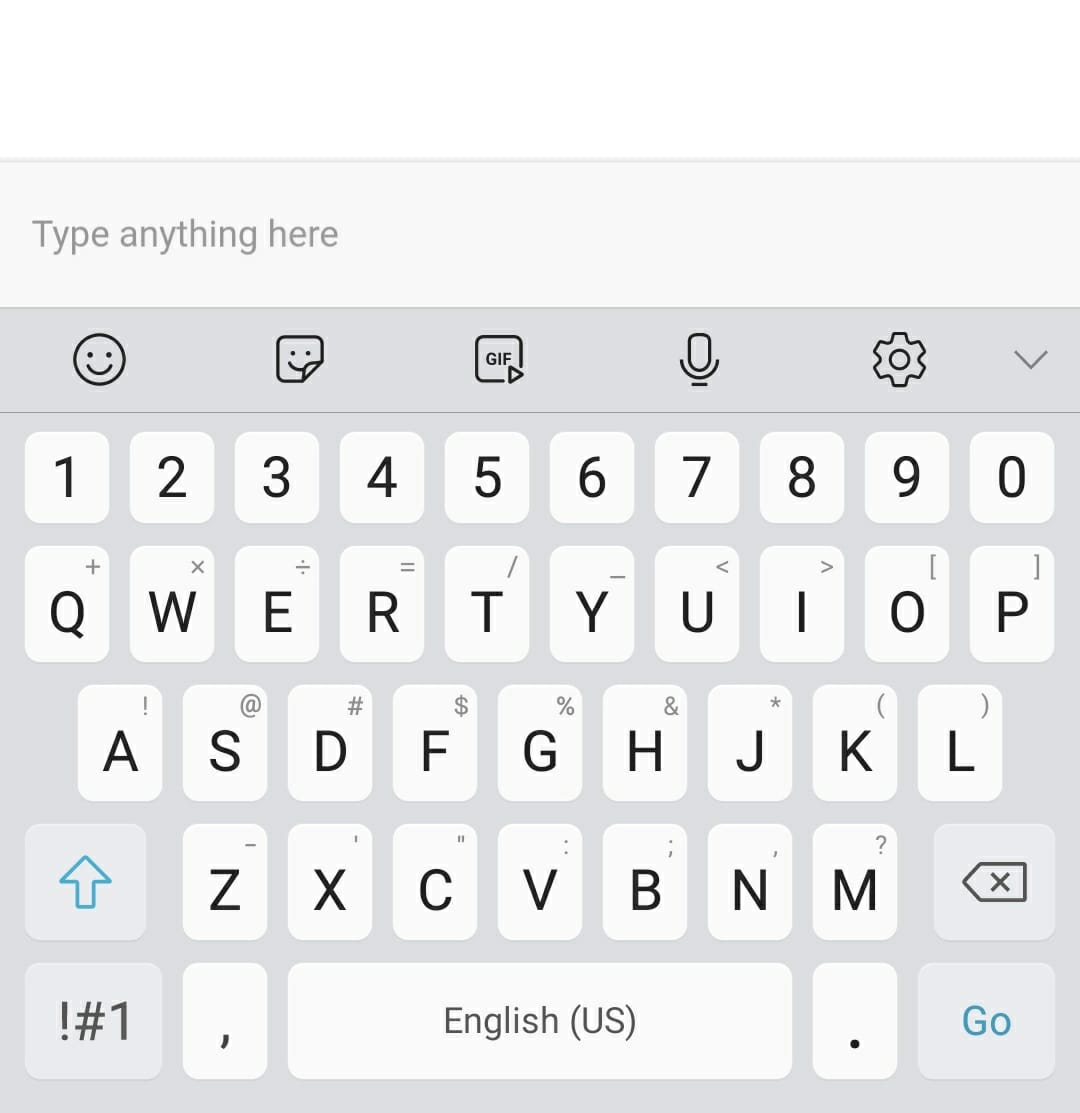
If you try the app in the device, you will notice how the footer is not attached to the keyboard:
Here is an image of the input at the footer:
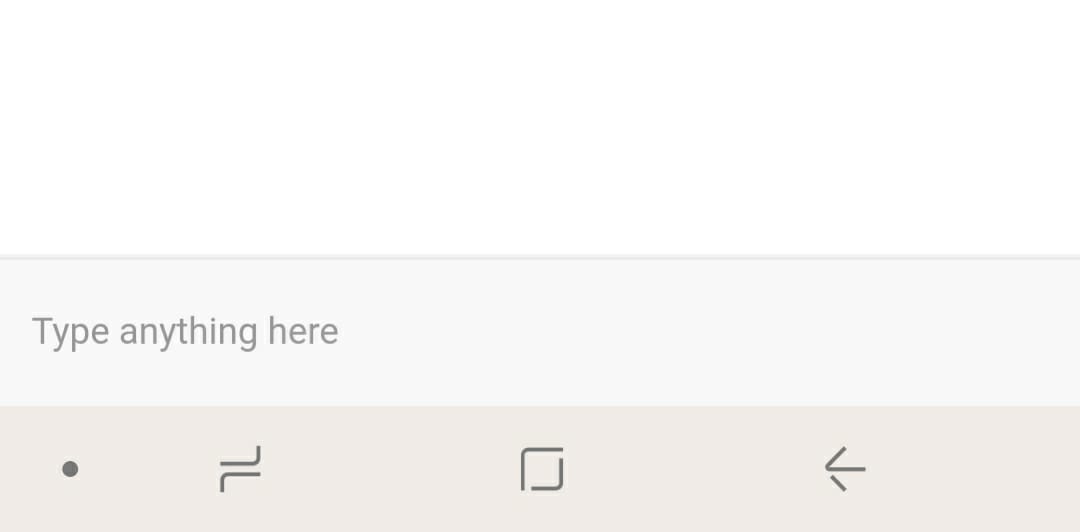
And here is an image showing that the input got hidden by the keyboard:

In order to resolve this, we will use the directive created by Manduro which is keyboard-attach directive
So, we will generate a new directive using the Ionic CLI. In order to do so, run the following command in your console:
ionic g directive keyboard-attach
This will generate a folder into src called directives. Inside this folder, open the file keyboard-attach.ts which is located inside the folder “keyboard-attach”.
Then, feel free to remove the whole code of this file and place the following one:
import { Directive, ElementRef, Input, OnDestroy, OnInit } from '@angular/core';
import { Keyboard } from '@ionic-native/keyboard';
import { Content, Platform } from 'ionic-angular';
import { Subscription } from 'rxjs/Subscription';

/**
 * @name KeyboardAttachDirective
 * @source https://gist.github.com/Manduro/bc121fd39f21558df2a952b39e907754
 * @description
 * The `keyboardAttach` directive will cause an element to float above the
 * keyboard when the keyboard shows. Currently only supports the `ion-footer` element.
 *
 * ### Notes
 * - This directive requires [Ionic Native](https://github.com/driftyco/ionic-native)
 * and the [Ionic Keyboard Plugin](https://github.com/driftyco/ionic-plugin-keyboard).
 * - Currently only tested to work on iOS.
 * - If there is an input in your footer, you will need to set
 *   `Keyboard.disableScroll(true)`.
 *
 * @usage
 *
 * ```html
 * <ion-content #content>
 * </ion-content>
 *
 * <ion-footer [keyboardAttach]="content">
 *   <ion-toolbar>
 *     <ion-item>
 *       <ion-input></ion-input>
 *     </ion-item>
 *   </ion-toolbar>
 * </ion-footer>
 * ```
 */

@Directive({
  selector: '[keyboardAttach]'
})
export class KeyboardAttachDirective implements OnInit, OnDestroy {
  @Input('keyboardAttach') content: Content;

  private onShowSubscription: Subscription;
  private onHideSubscription: Subscription;

  constructor(
    private elementRef: ElementRef,
    private keyboard: Keyboard,
    private platform: Platform
  ) {}

  ngOnInit() {
    if (this.platform.is('cordova') && this.platform.is('ios') || this.platform.is('android')) {
      this.onShowSubscription = this.keyboard.onKeyboardShow().subscribe(e => this.onShow(e));
      this.onHideSubscription = this.keyboard.onKeyboardHide().subscribe(() => this.onHide());
    }
  }

  ngOnDestroy() {
    if (this.onShowSubscription) {
      this.onShowSubscription.unsubscribe();
    }
    if (this.onHideSubscription) {
      this.onHideSubscription.unsubscribe();
    }
  }

  private onShow(e) {
    let keyboardHeight: number = e.keyboardHeight || (e.detail && e.detail.keyboardHeight);
    this.setElementPosition(keyboardHeight);
  };

  private onHide() {
    this.setElementPosition(0);
  };

  private setElementPosition(pixels: number) {
    this.elementRef.nativeElement.style.paddingBottom = pixels + 'px';
    this.content.resize();
  }
}
After placing this code, you will notice that the following dependence will be in red “import { Keyboard } from ‘@ionic-native/keyboard’;” It means that we need to install the native keyboard module of Ionic. To do so, run the following command in your console:
ionic cordova plugin add ionic-plugin-keyboard npm install –save @ionic-native/keyboard
If the first command gives you an error, feel free to ignore it. It is because this plugin may exist in your installation.
Then, you will need to import this module in a global scope. To do so, go to app.module.ts file which is located at src/app and at the top, import the following:
import { Keyboard } from '@ionic-native/keyboard';
and inside the providers array, place the following:
Keyboard
Your code will look as the following at the end:
import { Keyboard } from '@ionic-native/keyboard';
import { BrowserModule } from '@angular/platform-browser';
import { ErrorHandler, NgModule } from '@angular/core';
import { IonicApp, IonicErrorHandler, IonicModule } from 'ionic-angular';

import { MyApp } from './app.component';
import { HomePage } from '../pages/home/home';
import { ListPage } from '../pages/list/list';

import { StatusBar } from '@ionic-native/status-bar';
import { SplashScreen } from '@ionic-native/splash-screen';

@NgModule({
  declarations: [
    MyApp,
    HomePage,
    ListPage
  ],
  imports: [
    BrowserModule,
    IonicModule.forRoot(MyApp),
  ],
  bootstrap: [IonicApp],
  entryComponents: [
    MyApp,
    HomePage,
    ListPage
  ],
  providers: [
    Keyboard,
    StatusBar,
    SplashScreen,
    {provide: ErrorHandler, useClass: IonicErrorHandler}
  ]
})
export class AppModule {}
If you go back to the keyboard-attach directive, it will not complain anymore since the plugin was installed. Now we need to declare a global access to the directive in our app.module.ts. So, at the top of app.module.ts add the following import:
import { DirectivesModule } from '../directives/directives.module';
and in the imports array, add the following element:
DirectivesModule
And your code will look at the following:
import { DirectivesModule } from '../directives/directives.module';
import { Keyboard } from '@ionic-native/keyboard';
import { BrowserModule } from '@angular/platform-browser';
import { ErrorHandler, NgModule } from '@angular/core';
import { IonicApp, IonicErrorHandler, IonicModule } from 'ionic-angular';

import { MyApp } from './app.component';
import { HomePage } from '../pages/home/home';
import { ListPage } from '../pages/list/list';

import { StatusBar } from '@ionic-native/status-bar';
import { SplashScreen } from '@ionic-native/splash-screen';

@NgModule({
  declarations: [
    MyApp,
    HomePage,
    ListPage
  ],
  imports: [
    DirectivesModule,
    BrowserModule,
    IonicModule.forRoot(MyApp),
  ],
  bootstrap: [IonicApp],
  entryComponents: [
    MyApp,
    HomePage,
    ListPage
  ],
  providers: [
    Keyboard,
    StatusBar,
    SplashScreen,
    {provide: ErrorHandler, useClass: IonicErrorHandler}
  ]
})
export class AppModule {}
Now, we are ready to start using the directive. So, go back to the home.html file and add a variable inside the ion-content tag as reference to our keyboard-attach directive. So, the tag should look as this:
<ion-content padding #content>
And attach the directive to the footer. The tag should look as the following:
<ion-footer [keyboardAttach]="content">
and the whole code will look as the following:
<ion-header>
  <ion-navbar color="primary">
    <button ion-button menuToggle>
      <ion-icon name="menu"></ion-icon>
    </button>
    <ion-title>Home</ion-title>
  </ion-navbar>
</ion-header>

<ion-content padding #content>
  <h3>Ionic Menu Starter</h3>

  <p>
    If you get lost, the
    <a href="http://ionicframework.com/docs/v2">docs</a> will show you the way.
  </p>

  <button ion-button secondary menuToggle>Toggle Menu</button>
</ion-content>

<ion-footer [keyboardAttach]="content">
  <ion-toolbar>
    <ion-input type="text" placeholder="Type anything here"></ion-input>
  </ion-toolbar>
</ion-footer>
If we check now, the input is now attached to the keyboard allowing the user to see it :D
And this is all :D now you just need to make sure to include the directive whenever you have an input located at the footer of a page.
You can download the code of this tutorial in the following repo https://github.com/jayserdny/ionic-3-translucent-status-bar